Navigating the CVAT Interface: Tips and Tricks
CVAT is a powerful web-based open-source image annotation tool developed by Intel and now maintained by OpenCV. Its user-friendly interface and extensive annotation features make it a popular choice for object detection, classification, tracking, and segmentation tasks. In this article, we will delve into the CVAT user interface and provide you with valuable tips and tricks to optimize your workflow and enhance your experience with this software.
Key Takeaways:
- Customize the CVAT interface to suit your preferences and improve your user experience.
- CVAT offers various annotation tools such as bounding boxes, polygons, polylines, and keypoints.
- Annotate images and videos effortlessly using CVAT's intuitive interface.
- Export your annotations in different formats such as VOC XML, COCO JSON, and YOLO annotations.
- Follow best practices for efficient annotation in CVAT to maximize your productivity.
Understanding CVAT's Interface
When you launch CVAT, you will see a page where you can create and manage tasks. You can upload your images or videos, specify class labels, and start annotating. CVAT offers various annotation tools, such as bounding boxes, polygons, polylines, keypoints, and more.
The CVAT interface is designed to be user-friendly and customizable. It allows you to tailor the interface according to your preferences, optimizing your workflow and enhancing your overall experience. You can customize the layout, toolbars, and keyboard shortcuts to suit your annotation needs.
By customizing the CVAT interface, you can streamline your annotation process and improve efficiency. Whether you prefer a minimalist interface or a feature-rich one, CVAT provides flexibility for customization.
One of the key features of the CVAT interface customization is the ability to create your own workspace layouts. You can organize tool panels, adjust their sizes, and arrange them in a way that best suits your workflow. This allows you to focus on the specific annotation tasks at hand and eliminates distractions.
Moreover, CVAT offers a range of visualization options that can be modified to meet your requirements. You can adjust colors, opacity, and line thickness to enhance visibility and distinguish between different annotation types. This customization feature promotes accurate labeling and reduces the chances of annotation errors.
CVAT Interface Customization Options:
- Create custom workspace layouts
- Modify tool panels and sizes
- Adjust visualization options
- Customize color schemes
- Set keyboard shortcuts
By customizing the CVAT interface to align with your annotation preferences, you can create a more efficient and user-friendly environment. This design flexibility ensures a seamless annotation process, allowing you to focus on the task at hand without unnecessary distractions.
| Benefits of CVAT Interface Customization | How to Customize CVAT Interface |
|---|---|
| Improved workflow efficiency | Create custom workspace layouts |
| Enhanced user experience | Modify tool panels and sizes |
| Reduced annotation errors | Adjust visualization options |
| Improved visibility and distinction between annotations | Customize color schemes |
| Streamlined annotation process | Set keyboard shortcuts |
Annotating Images in CVAT
To annotate images in CVAT, you can utilize the annotation tools provided by the platform. These tools enable you to perform various annotation tasks, including object detection, semantic segmentation, and keypoint detection. By leveraging these powerful features, you can accurately label and annotate images for your computer vision projects.
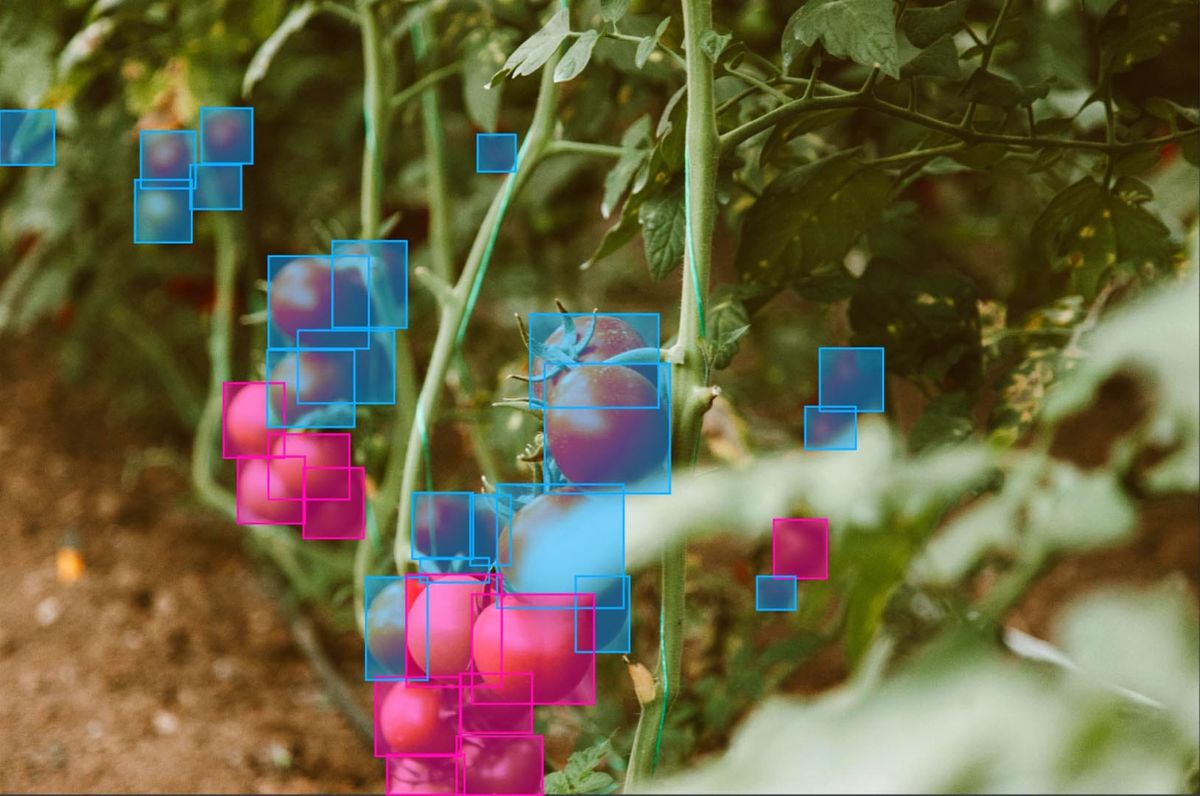
For object detection, CVAT offers a versatile annotation tool that allows you to draw bounding boxes around objects of interest. These bounding boxes help train your models to identify and classify objects within images effectively.
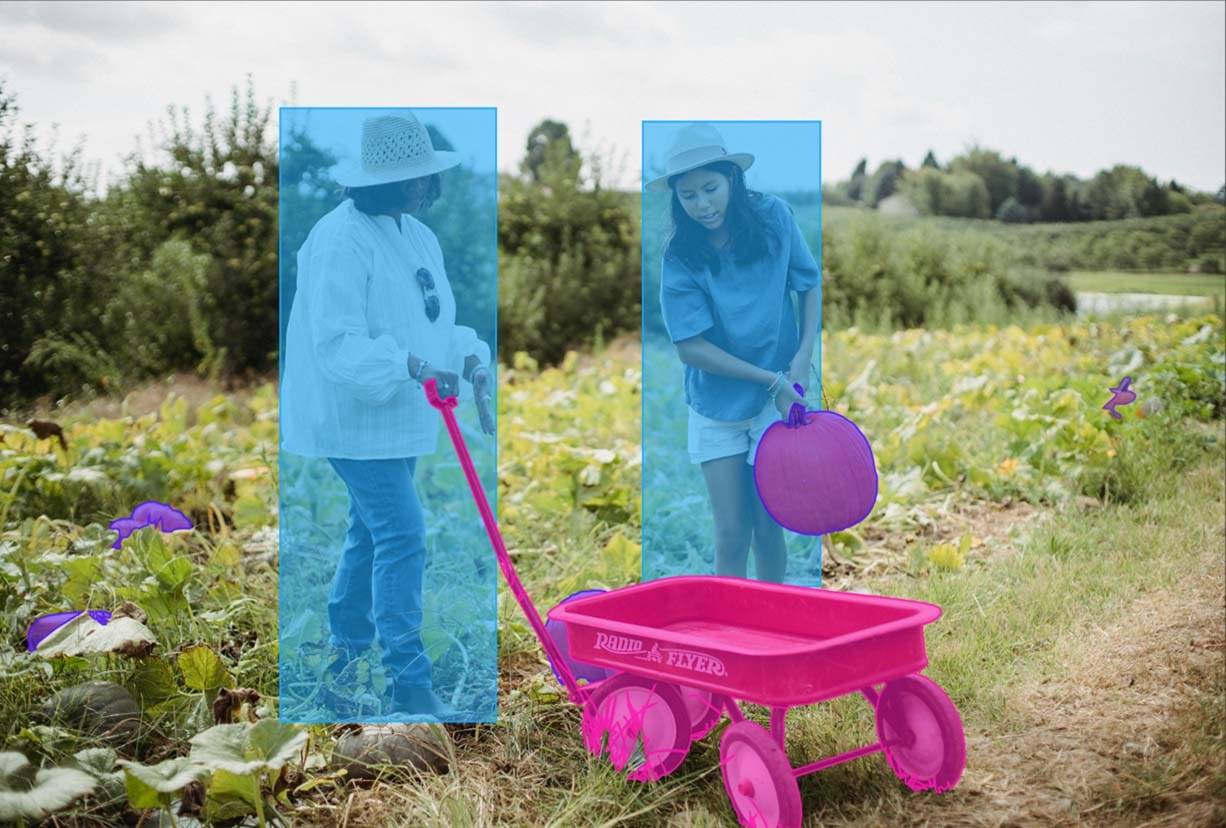
If you are working on semantic segmentation tasks, CVAT enables you to create polygon masks to define and label different regions and objects within an image. This level of granularity enhances the accuracy of your annotations, ultimately improving the performance of your segmentation models.
In addition to bounding boxes and polygon masks, CVAT also provides keypoint annotation capabilities. This feature assists in keypoint detection tasks, allowing you to mark specific points of interest on objects within an image. By placing keypoints, you can precisely annotate and train models for tasks such as facial landmark detection or pose estimation.
CVAT also supports model-assisted labeling, which harnesses the power of artificial intelligence to automate the annotation process. You can utilize pre-trained models or train your own models to assist in annotating images more efficiently. This integration of AI technology helps accelerate the annotation workflow, reducing manual effort while maintaining high-quality annotations.
By leveraging CVAT's annotation tools and model-assisted labeling capabilities, you can streamline the image annotation process and ensure accurate and comprehensive annotations. These annotations serve as a crucial foundation for training robust computer vision models.
Whether you are working on object detection, semantic segmentation, or keypoint detection tasks, CVAT provides a user-friendly interface and a comprehensive set of annotation tools to cater to your specific project needs.
Annotating Videos in CVAT
CVAT is not only limited to image annotation, but it also provides powerful tools for video annotation. With CVAT, you can annotate each frame of a video, track objects across frames, and interpolate annotations between keyframes. This functionality makes CVAT an essential tool for video analysis and computer vision tasks.
Annotating Frames in Video
Annotation in CVAT works similarly for both images and videos. You can use bounding boxes, polygons, keypoints, and other annotation tools to label objects in each frame of a video. This level of precision allows for accurate object detection and tracking throughout the entire video.
Tracking Objects Across Frames
CVAT enables you to track objects across frames in a video. By annotating the initial frame and enabling the tracking feature, CVAT automatically propagates the annotation to subsequent frames, saving you time and effort. This feature is particularly useful for tracking moving objects or monitoring the trajectory of objects over time.
Interpolating Annotations between Keyframes
To make annotation even more efficient, CVAT offers the ability to interpolate annotations between keyframes. Keyframes are specific frames where object annotations are manually added or adjusted. CVAT then intelligently fills in the annotations for the frames between the keyframes, eliminating the need for annotating every single frame and saving you valuable time.
Additional Tools for Video Annotation
CVAT provides several tools to enhance the video annotation process. These tools include:
Switching Between Outside of Frame Annotations: CVAT allows annotators to annotate objects that are partially or completely outside the frame. This functionality ensures complete and accurate labeling of objects, even when they are not fully visible in the video frame.Marking Occluded Objects: Annotators can mark objects as occluded in CVAT, indicating that the object is partially or fully obscured by other objects within the video. This helps in distinguishing occluded objects from fully visible ones during object tracking.AI-Assisted Tracking: CVAT leverages artificial intelligence to assist with object tracking in videos. By using AI-assisted tracking, you can automate the annotation process and improve the accuracy of tracking annotations.
Summary
CVAT's video annotation capabilities make it a valuable tool for tracking objects and analyzing videos in computer vision applications. Whether you need to annotate individual frames, track objects across frames, or interpolate annotations between keyframes, CVAT provides the necessary tools to streamline the video annotation process and ensure accurate results.
Exporting Annotations from CVAT
Once you have completed annotating your data in CVAT, you can export the annotations in various formats. CVAT supports formats such as label VOC XML, label COCO JSON, and label YOLO annotations. You can choose the format that is compatible with your specific needs and the machine learning model you intend to use for your project.
Annotation Export Formats
CVAT allows you to export your annotations in different formats to facilitate seamless integration with other tools and frameworks. The supported annotation export formats in CVAT include:
- VOC XML: This format follows the PASCAL VOC dataset structure and is commonly used in various computer vision tasks. It includes bounding boxes and class labels, making it ideal for object detection and classification tasks.
- COCO JSON: The COCO (Common Objects in Context) format is widely adopted in the computer vision community. It provides a unified representation for object detection, segmentation, and keypoint detection tasks. The COCO JSON format includes bounding boxes, segmentation masks, and keypoint annotations.
- YOLO: The YOLO (You Only Look Once) format is known for its efficient real-time object detection capabilities. CVAT supports exporting annotations in the YOLO format, which includes bounding boxes and class labels.
By supporting these popular annotation formats, CVAT ensures flexibility and compatibility with various downstream applications, including training machine learning models with popular frameworks like TensorFlow and PyTorch.
Exporting Annotations in CVAT
To export your annotations in CVAT, follow these simple steps:
- Ensure that you have finished annotating your data in CVAT.
- Click on the "Export Annotations" button within the CVAT interface.
- Choose the desired format from the available options, such as VOC XML, COCO JSON, or YOLO.
- Select the specific classes or labels you want to include in the export, if applicable.
- Click the "Export" button to initiate the export process.
- Save the exported file to your preferred location.
With these straightforward steps, you can quickly generate annotation files in the format that best suits your workflow and project requirements.
Example Annotation Export
Here is an example of how an annotation export from CVAT may look in the COCO JSON format:
| Annotation | Format | Example |
|---|---|---|
| Bounding Box | COCO JSON |
In this example, the annotation export includes bounding boxes for different objects in the COCO JSON format. The export file contains information such as the coordinates of each bounding box, the associated class labels, and other relevant metadata.
Tips for Efficient Annotation in CVAT
When it comes to annotating in CVAT, following certain tips and best practices can significantly enhance your efficiency. By incorporating these techniques into your workflow, you can streamline the annotation process and improve the accuracy of your annotations.
Annotating Techniques:
Here are some key tips to consider while annotating in CVAT:
- Label Entirely Around Objects: When annotating objects, make sure to label the entire region surrounding the object. Avoid leaving any gaps or overlapping annotations, as this can lead to confusion during object recognition and detection.
- Annotate Occluded Objects Fully: If an object is partially occluded or hidden by another object, annotate the visible portions accurately. This helps in training models to recognize objects under challenging conditions.
- Label Partially Out-of-Frame Objects: If an object is partially outside the frame, label the visible portion. This provides valuable information about the object's presence, even if it is not fully captured in the image or video.
- Avoid Overlapping or Nested Bounding Boxes: When annotating objects, avoid creating overlapping or nested bounding boxes. These annotations can confuse the model and affect its ability to accurately identify and localize objects.
- Start with Most Represented Class: To optimize your annotation process, begin by labeling objects from the most represented class. This allows you to quickly annotate objects that occur frequently, reducing the time required for annotation.
By following these best practices, you can ensure the quality and reliability of your annotations in CVAT, leading to improved performance of your computer vision models.
"Accurate and complete annotations are essential in training effective computer vision models."
Deploying CVAT Locally
If you prefer to work with CVAT on your local machine, you can install and configure it locally. This allows you to overcome limitations such as the number of tasks per user and the size of uploaded data. To set up CVAT locally, you need to have Docker installed and then clone the CVAT repository. By following the installation steps, you can run CVAT on your local machine and access it through your browser.
Installation Steps:
- Install Docker on your local machine.
- Clone the CVAT repository using the Git command:
git clone https://github.com/opencv/cvat.git - Enter the CVAT directory:
cd cvat - Deploy the Docker containers using Docker Compose:
docker-compose up -d - Wait for the containers to be built and started.
- Access CVAT on your local machine by opening a web browser and navigating to:
http://localhost:8080
By following these steps, you can enjoy the benefits of using CVAT locally, including greater control over your annotation environment and improved performance. Whether you are working on a small project or dealing with large-scale datasets, deploying CVAT on your local machine provides a flexible and efficient solution.
Alternative Annotation Tools
While CVAT is a powerful annotation tool, there are alternative options available for computer vision annotation. These tools offer similar functionalities and may be suitable for different project requirements.
1. LabelImg
LabelImg is a popular open-source annotation tool that provides a user-friendly interface for image annotation. It offers features such as drawing bounding boxes, creating polygons, and labeling objects with customized classes. With its ease of use and compatibility with different annotation formats, LabelImg is a reliable alternative to CVAT.
2. LabelMe
LabelMe is another widely used annotation tool for computer vision tasks. It allows users to annotate images with bounding boxes, polygons, keypoints, and more. LabelMe also provides collaborative annotation features, making it suitable for projects involving multiple annotators. With its versatility and robust annotation capabilities, LabelMe is a valuable alternative to CVAT.
3. Labellerr
Labellerr is an advanced annotation platform that offers AI-assisted annotation and zero-shot capabilities. It combines human annotators with machine learning algorithms to streamline the annotation process and improve efficiency. Labellerr's sophisticated features make it an excellent choice for complex computer vision projects that require accurate and scalable annotations.
Considering the specific needs of your project, you can explore these alternative annotation tools to find the one that best fits your requirements. Each tool has its own strengths, so it's important to evaluate their features, usability, and compatibility with your workflow.
Conclusion
Efficiently navigating and utilizing the user interface (UI) of CVAT is essential for optimizing the annotation process. By familiarizing yourself with the interface, customizing it to your specific requirements, and employing industry best practices, you can significantly enhance your workflow and overall experience with the CVAT software.
CVAT's UI offers a user-friendly environment for annotating images and videos, making it suitable for various computer vision tasks. Whether you choose to deploy CVAT locally or utilize it online, the platform provides powerful annotation tools and functionalities that can streamline your annotation workflow.
To ensure optimal annotation productivity, it is advisable to follow a few key UI best practices. These include labeling objects entirely, annotating occluded objects comprehensively, and accurately labeling partially out-of-frame objects. Additionally, avoid overlapping or nested bounding boxes, as such annotations can confuse your machine learning models.
By incorporating these UI tips and tricks and leveraging CVAT's intuitive interface, users can achieve efficient annotation, save time, and ultimately produce high-quality annotated datasets for their computer vision projects.
FAQ
How can I customize the CVAT interface?
You can customize the CVAT interface according to your preferences to improve your user experience.
What annotation tools does CVAT provide for image annotation?
CVAT offers various annotation tools for image annotation, including bounding boxes, polygons, polylines, keypoints, and more.
Can CVAT assist in automating the annotation process?
Yes, CVAT offers model-assisted labeling, where artificial intelligence can assist in automating the annotation process using pre-trained models or your own models.
How does CVAT support video annotation?
CVAT allows you to create annotations on each frame of the video, track objects across frames, and interpolate annotations between keyframes. It also offers AI-assisted tracking and tools to make video annotation easier.
In what formats can I export annotations from CVAT?
CVAT supports formats such as label VOC XML, label COCO JSON, and label YOLO annotations, allowing you to choose the format that is compatible with your specific needs and machine learning models.
What are some tips for efficient annotation in CVAT?
Some tips for efficient annotation in CVAT include labeling entirely around objects, annotating occluded objects fully, and starting with the most represented class to streamline the annotation process.
Can I deploy CVAT locally?
Yes, you can install and configure CVAT locally by following the installation steps and running it on your local machine using Docker.
Are there alternative annotation tools to CVAT?
Yes, there are alternative annotation tools available, such as LabelImg, LabelMe, and Labellerr, each offering different features and capabilities depending on your project requirements.
How can I optimize my workflow and experience with the CVAT software?
By understanding the CVAT interface, customizing it to your needs, and following best practices, you can optimize your workflow and enhance your experience with the CVAT software.
Comments ()